The Cornell Lab Bird Academy › Discussion Groups › Nature Journaling and Field Sketching › Getting Comfortable with Watercolor
-
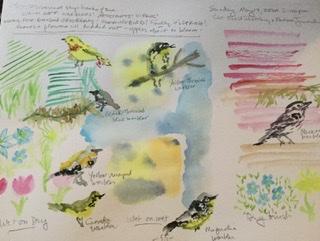
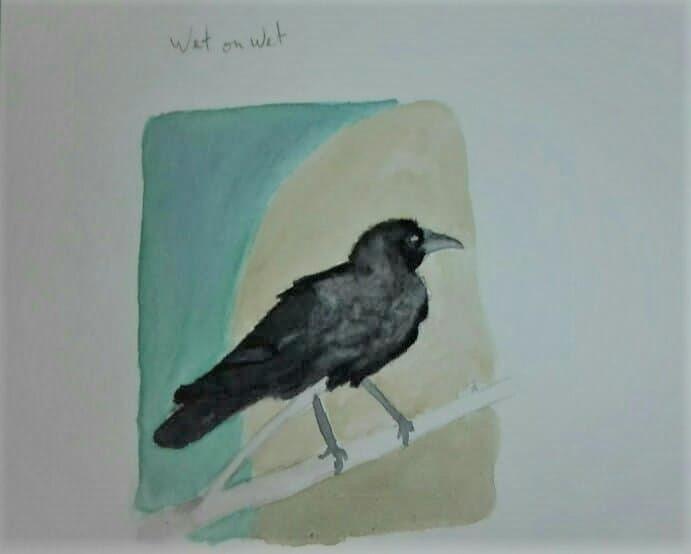
 I had some fun experimenting with all three techniques, and tried some quick gesture-type sketches with the aquabrush and watercolors. I found that keeping the brush extra dry helped with the finer lines, deeper color tones and necklaces of the warblers; a wetter brush helped soften the gray tones..I definitely need more practice, but it was lots of fun..I think all of these techniques will be very helpful in my journaling projects. I definitely will use the dry brush for tree branches and trunks; the wet on wet for skies and water scenes and the wet on dry will be helpful for getting colors on the paper, to refine with added details
 -
I haven’t touched water colour since grade school so I’m still having trouble forming details and outlines.my feathers look more like blobs than feathers. But I am enjoying the colour and I love the water brush!
-
I tried all three on this Mourning dove. The wing and the back was wet on dry, the head, chest, and bottom were wet on wet and the branch was dry on dry. I discovered I like wet on wet and letting the colors do their thing. I find I still add too much water. I also am trying to figure out wing textures. My dry on dry didn't super work. Again the amount of water is really hard for me! But I like the idea of that technique making certain textures.
-
- I love your sweet morning dove. Nice blending of the colors and feather detail.
-
-
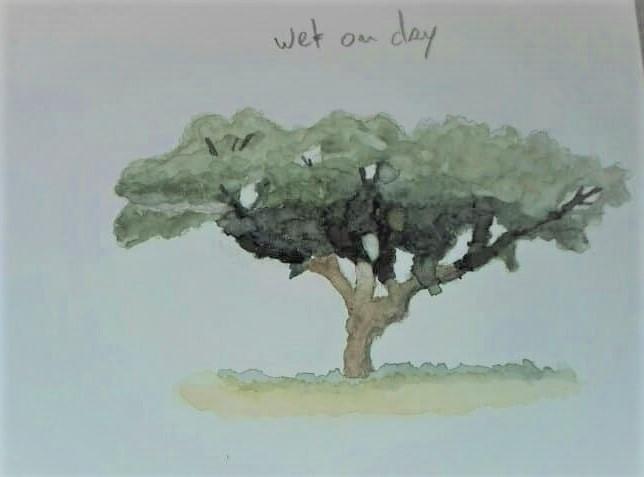
Have used all of the techniques but I found the simplified way of presenting and demonstrating helpful. After referring to some Wyeth works for dry brush ex.'s, found bone on a wood table presented opportunity for all 3 methods. Plan to utilize dry brush method more in the future.
-
My first attempt is to use the dry on dry technique, or nearly dry. I did this due to the small areas I was coloring. I used by comparison drawing of the hornets and honey bee and added color to it. I think the Asian hornet and the honey bee came out the best. I found it was difficult to get the brush dry enough not to be runny, but I got the hang of it, I think. I really enjoy working with color.
-
Nice bees and wasps. Cool journal pages. I have been studying, photographing, and painting native bees this spring. I work at a nature center in Virginia. It's nice to see the work of another insect artist. Your Asian giant Hornet is amazing.
-
@Avery Thanks Avery. I was a little surprised at it too. I think the suggestion of the hand really is what makes it stand out. I guess one has been found in eastern Washington so I hope this hornet can be stopped.
-
-
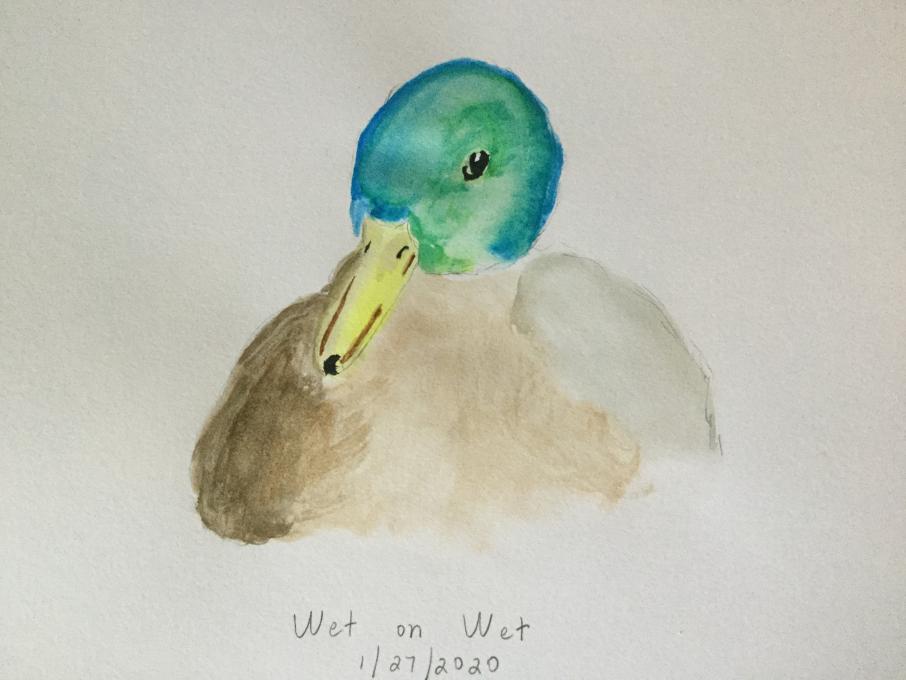
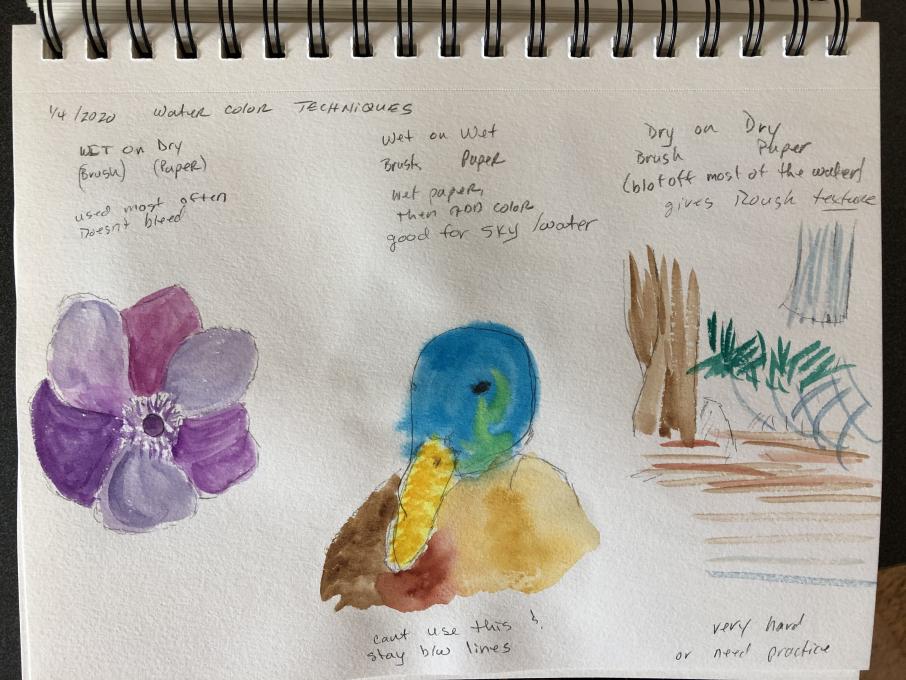
I have tried all three techniques but feel most comfortable with wet on dry. Wet-on-wet worked really well for doing the clouds in the Wasatch mountain picture. Wet-on-wet is still a challenge. Sometimes the brush is too dry and I pick up very little colour, other times it is too wet. In this picture of the Common Goldeneye I was able to apply a variety of techniques and felt more comfortable with how I was using the brush. The head of the duck is supposed to be iridescent green (looks black in the field) but that has been hard to achieve. Having fun trying though!
-
I love your Goldeneye. You captured the feathers and body nicely. Lovely cold sky and water. And your reflection is great, something I struggle with. Which came first, the reflection or the water, or. Did you do them together? Avery
-
-
Gah, wet-on-wet: too wet, colors too muted, etc.
-
Hi Amy. I love the way you captured the wonderful blended colors of the head & exquisite shadow of the bill. The details of the eye is great too.
-
-
There was no space to post my experience with 3D painting of the next topic. So I post it here. I (carefully) put an egg on the table. I noticed it casted a double concentric shadow, so I tried to copy it. I had to move fast, because my paint was drying rapidly. This make the contours a little bit wobbly making the egg more look like a potato ;). Nevertheless, I am happy with this first attempt.
-
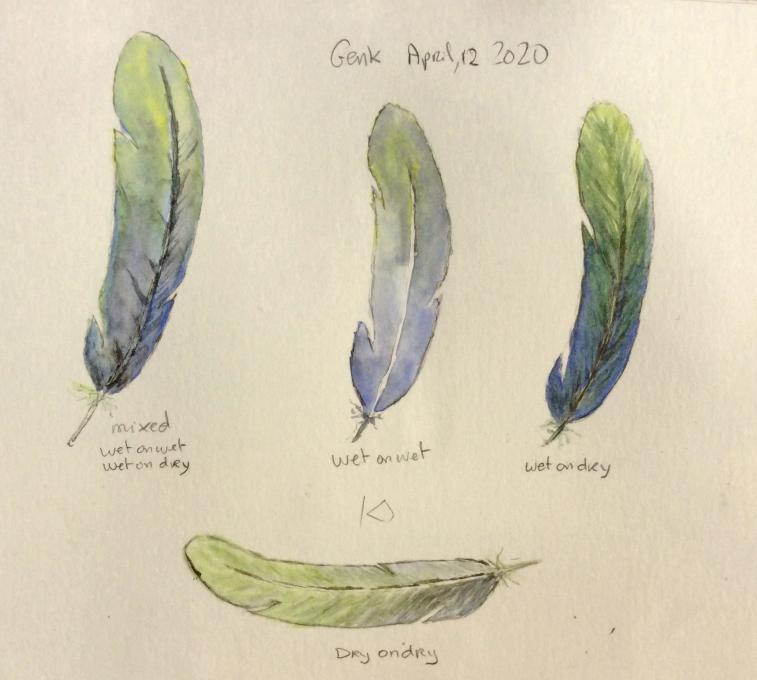
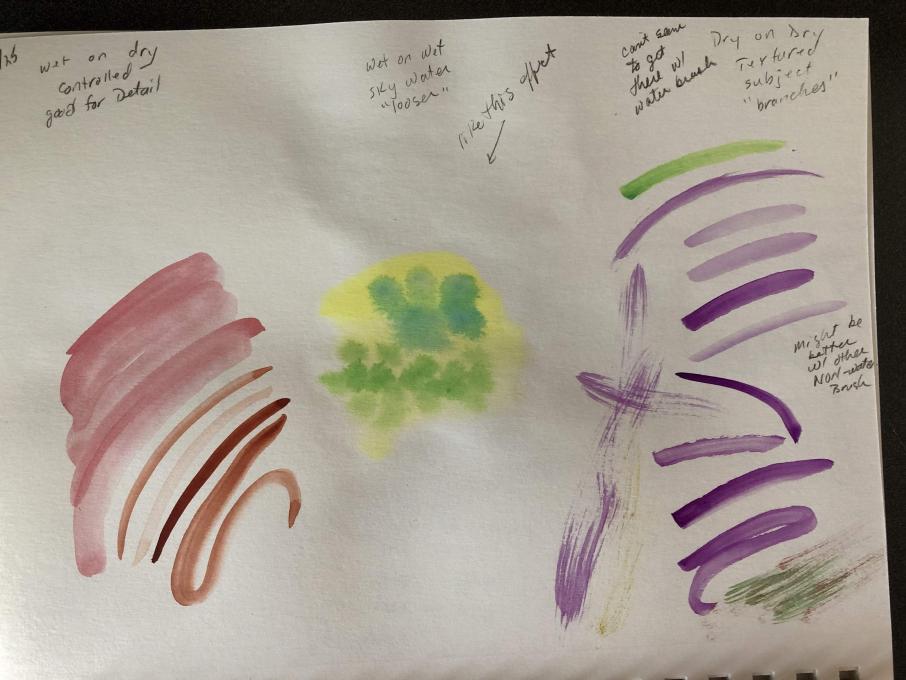
> I tried several variations on the techniques and I watched various Youtube videos. The video of Makoccino on how to paint a simple feather in watercolor inspired me to repeat this exercise with the other techniques as well. It gave a first impression about their possibilities and limitations of the various techniques. Wet on wet creates the most wonderful color effects. Challenges were controlling the amount of water, applying the paint at the right speed and matching the contours exactly. Dry on dry is much easier to control . It looks more like a pencil drawing. Wet on dry turned out to be darker than anticipated, but it is a nice technique to use as an overlay on wet on wet, as shown on the left feather.
-
Hello Koen. Gorgeous looking feathers and the specific details of each technique are definitely easier to see in your drawings. Thanks for sharing this.
-
-
I have tried doing wet on dry mostly. I like that technique because it is easy to do fine lines and it gives a clear color unlike some of the other techniques. Wet on wet has been a bit difficult for me though because it is a bit messy. Dry on dry is okay, but it doesn't give a clear color for me, so I prefer wet on dry overall. I think for my journaling projects, I think that I would use wet on wet for big spaces, dry on dry for items that have lots of texture, but I would typically use wet on dry.
-
-
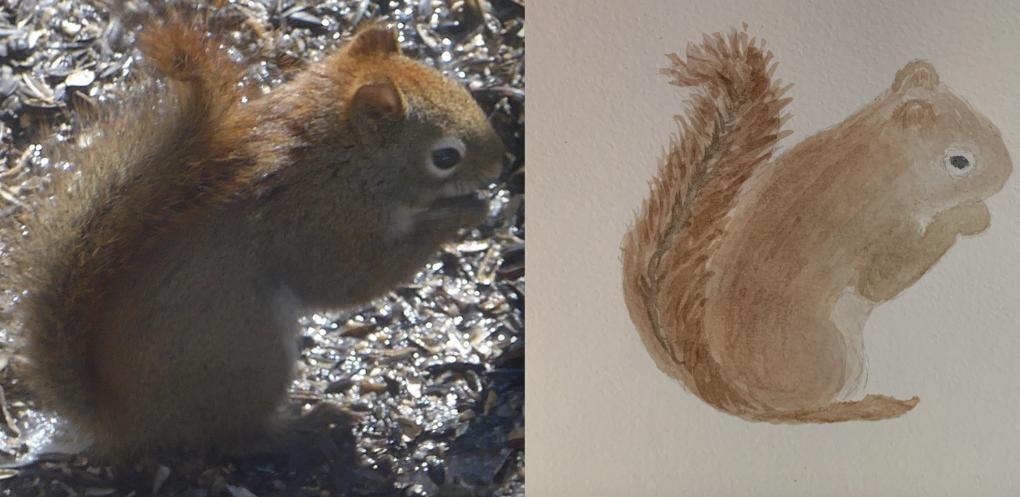
I never could have done this before this course. Here is a red squirrel eating a bird seed. This is an example of glazing.
-
Gorgeous looking details. Very realistic. I like how your drawing gives a sense of soft fur. Thanks for sharing this drawing.
-
-
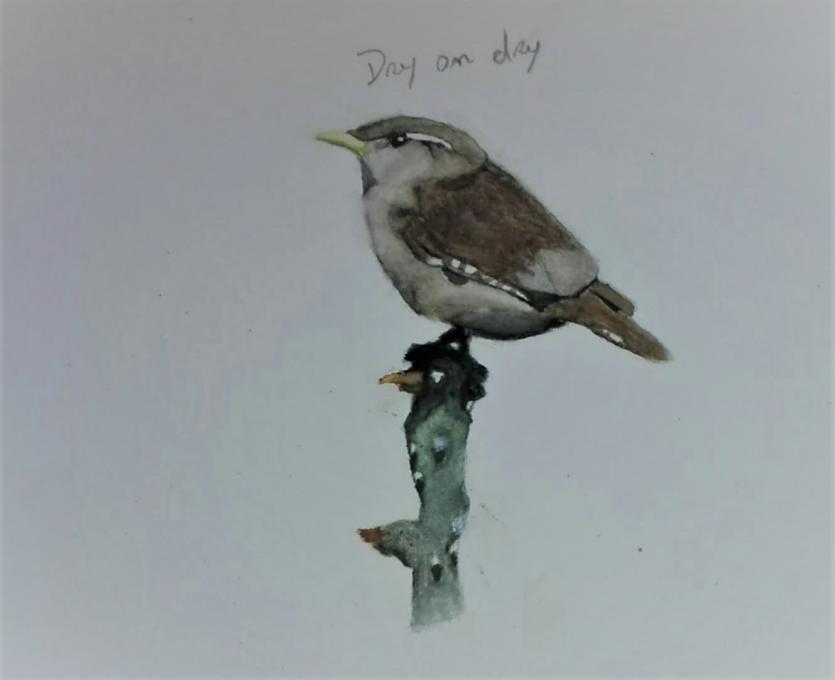
My exercises took me time. I'm not full adjusted to the dry-on-dry with the waterbrush. I must keep doing it. At some point I used the old style brushes to finish the painting. Maybe doing it in a small scale doesn't help too. These techniques for sure will be used while I'm doing nature journaling. For more satisfing results I need practice and practice more and more to give me better results.
-
These are just glorious, David! You have such subtle and yet strong contrast , great shadows and colors, and beautiful drawings 👏🏽👏🏽
-
David, you mentioned you not fully adjusted with the dry on dry with the water brush; I think the wren is wonderful painting, beautiful is the correct word. The other two are great also.
-
-
Here are two pages from my sketchbook showing use of wash, glazing, blending, wet-on-wet, wet-on-dry, and dry-on-dry. I looked back at some of my watercolors painted before I started this course, and wow! What a difference. Also, my sketchbook paper wasn't great for watercolor, so I found some old watercolor paper, cut it to size, and am painting on it and taping it into my sketchbook...
-
I like how you have used them Patricia, it reminds me to put together all the techniques I have been learning in this course
-
-
I've tried all three of these techniques. It's difficult to do dry brush with a water brush...I'll just have to keep trying. I hadn't thought about using wet on wet in my journal...great idea!
-
Hello all, I am a teacher learning how to distance teach for a rollout next Monday. I have been taking breaks from he stress with a deep dive into Journaling. I am really enjoying the watercolors and appreciate the instruction in this course.
-
Very nice journal pages, painting, lettering, info.
-
-
Patience and practice! I also think that my paper is a bit light weight, so maybe I shouldn't try too many layers. Lots of fun things to keep trying.
-
I had the same problem, Heidi. I found some old watercolor paper in my studio, cut it to size, and taped it into my sketchbook. I like the weight of my sketchbook paper for drawing, but watercolor really needs thicker, textured paper to make the medium as effective as possible.
-
-
Mixed Medium. Almost all Watercolors, some pen, pencil foundation, and metallics. R-Y-B-G-BL
-
I tried all the techniques. Are for certainthings your going to do.
-
-
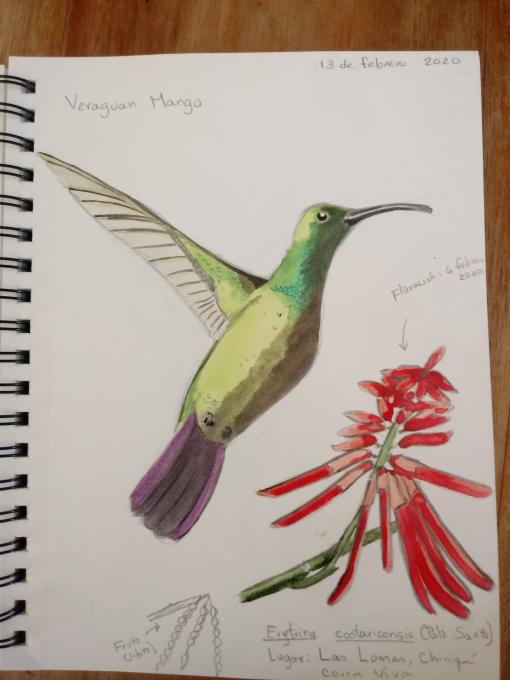
Hi Geminis. Great looking details on the hummingbird & flowers. Thanks for sharing this.
-
-
Previously I have only used wet on dry. Dry on dry was tricky and I would like to incorporate that and wet on wet in my own journal. I'd like to see more of both in application.
-
I tried all three. I think the wet-on-wet would work better on a stretched paper. The journal buckled too much and the colors pooled in the indented warp. However, I think wet-on-wet showcases the uniqueness of watercolor paints so I'd very much like to find a way to incorporate it into my journaling.
-
I love the iridescent quality of wet on wet paint technique. This was my first attempt. I think I will use it more often.
-
-
1. Will be trying these in the field hopefully. I find it hard to control the amount of water. 2. I am just beginning journaling, so I don't have any great thoughts other than to add colors to my drawings to help round out my journaling.
 I had some fun experimenting with all three techniques, and tried some quick gesture-type sketches with the aquabrush and watercolors. I found that keeping the brush extra dry helped with the finer lines, deeper color tones and necklaces of the warblers; a wetter brush helped soften the gray tones..I definitely need more practice, but it was lots of fun..I think all of these techniques will be very helpful in my journaling projects. I definitely will use the dry brush for tree branches and trunks; the wet on wet for skies and water scenes and the wet on dry will be helpful for getting colors on the paper, to refine with added details
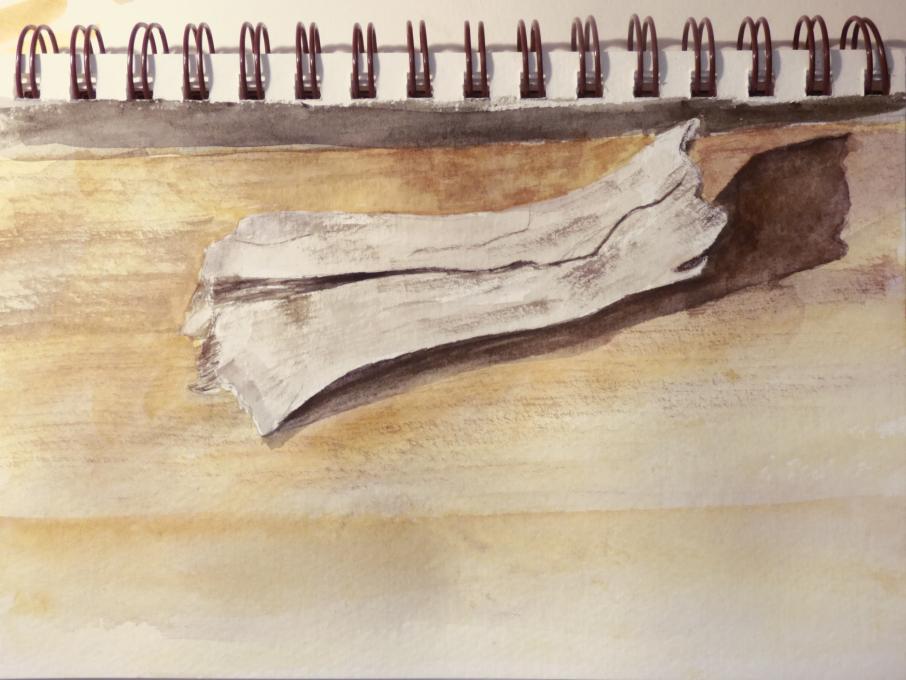 Have used all of the techniques but I found the simplified way of presenting and demonstrating helpful. After referring to some Wyeth works for dry brush ex.'s, found bone on a wood table presented opportunity for all 3 methods. Plan to utilize dry brush method more in the future.
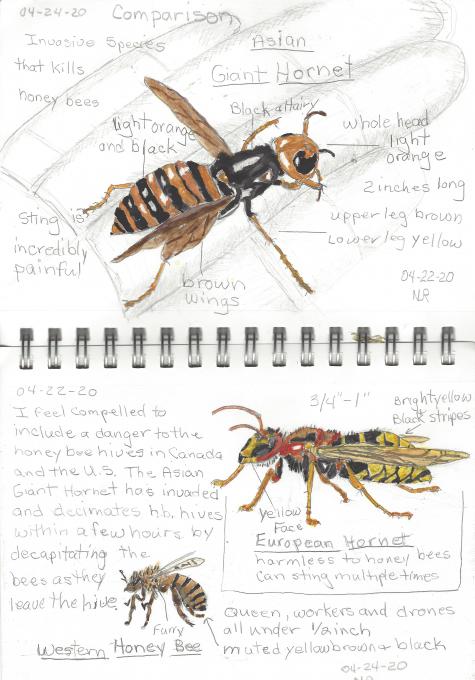
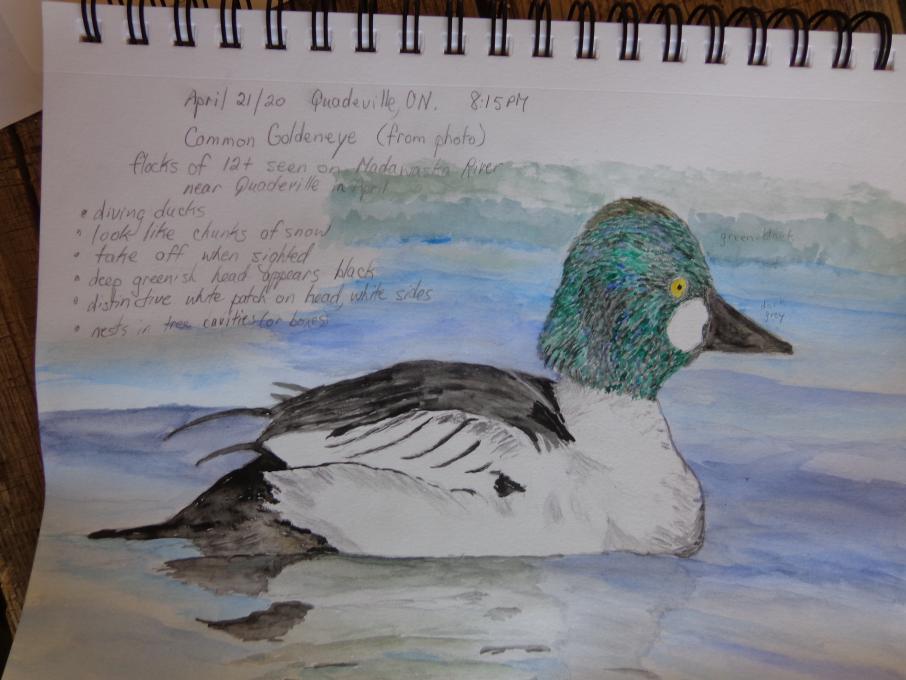 I have tried all three techniques but feel most comfortable with wet on dry. Wet-on-wet worked really well for doing the clouds in the Wasatch mountain picture. Wet-on-wet is still a challenge. Sometimes the brush is too dry and I pick up very little colour, other times it is too wet. In this picture of the Common Goldeneye I was able to apply a variety of techniques and felt more comfortable with how I was using the brush. The head of the duck is supposed to be iridescent green (looks black in the field) but that has been hard to achieve. Having fun trying though!
 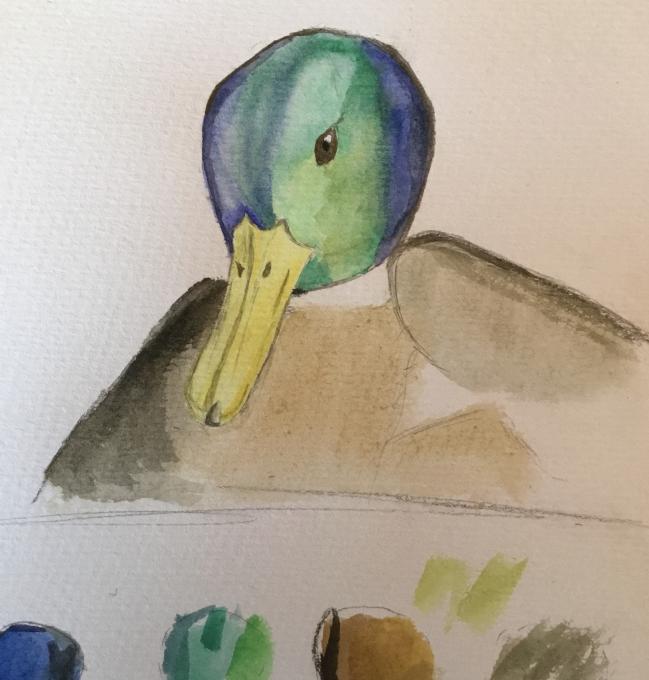 Gah, wet-on-wet: too wet, colors too muted, etc.
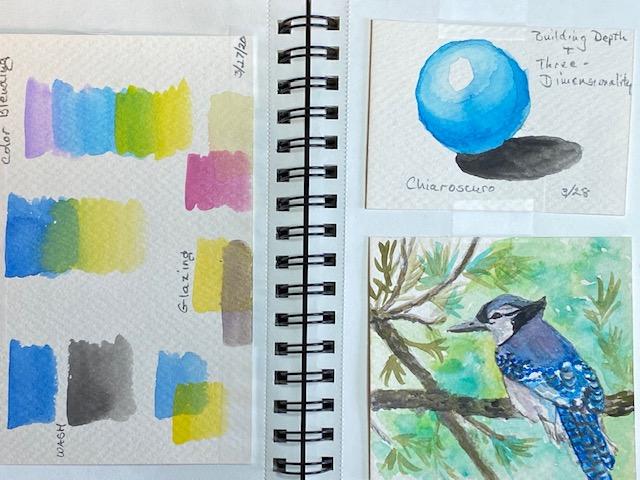 Here are two pages from my sketchbook showing use of wash, glazing, blending, wet-on-wet, wet-on-dry, and dry-on-dry. I looked back at some of my watercolors painted before I started this course, and wow! What a difference. Also, my sketchbook paper wasn't great for watercolor, so I found some old watercolor paper, cut it to size, and am painting on it and taping it into my sketchbook...
 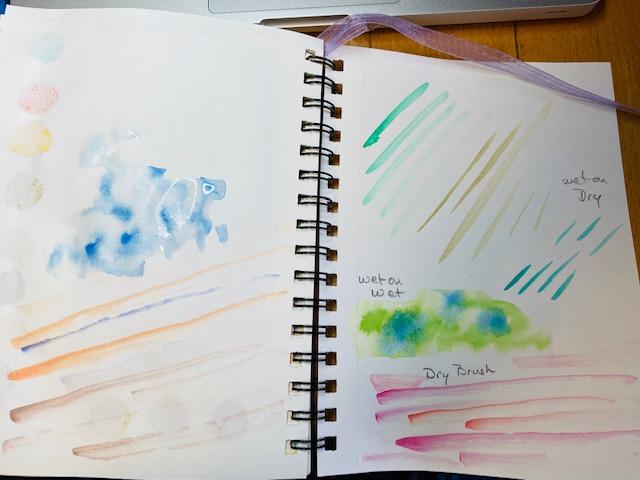 I've tried all three of these techniques. It's difficult to do dry brush with a water brush...I'll just have to keep trying. I hadn't thought about using wet on wet in my journal...great idea!
 Patience and practice! I also think that my paper is a bit light weight, so maybe I shouldn't try too many layers. Lots of fun things to keep trying.
  Mixed Medium. Almost all Watercolors, some pen, pencil foundation, and metallics. R-Y-B-G-BL
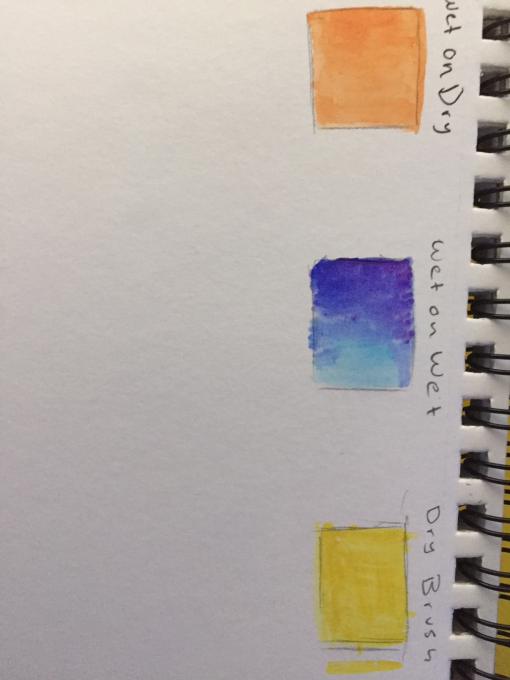
Read More: