The Cornell Lab Bird Academy › Discussion Groups › Bird Photography with Melissa Groo › Practice Crafting Great Bird Photos
-
Bird AcademyBird AcademyWhat did you notice when you followed (or broke!) the “rules” of composition? Share in the discussion below.You must be enrolled in the course to reply to this topic.
-
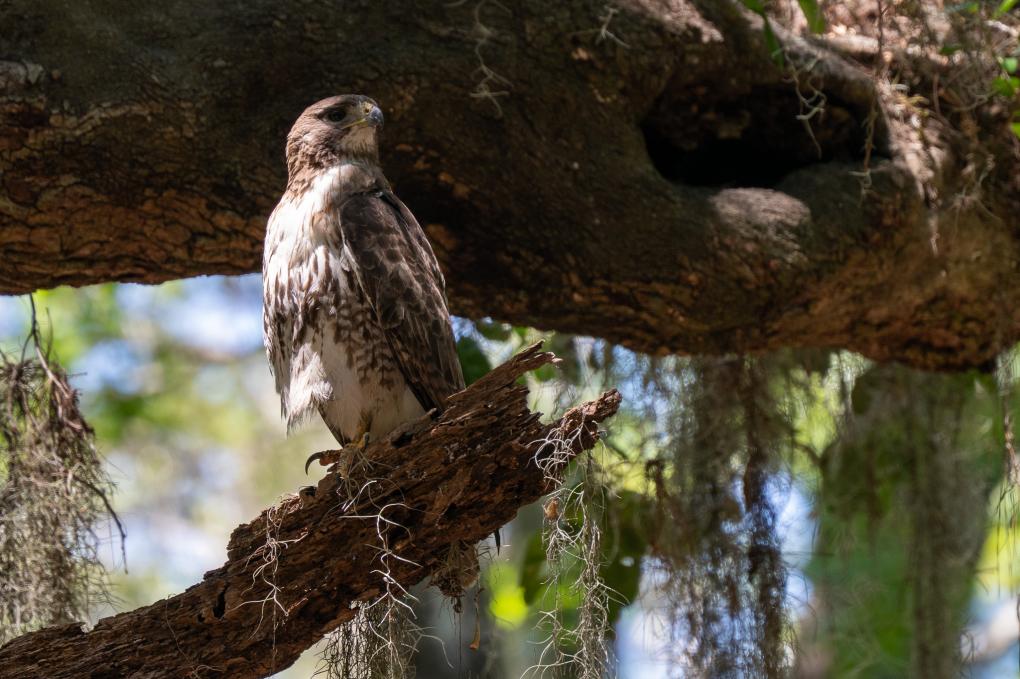
Was very happy to get this shot of a young red-tailed hawk! It was in a wooded area with challenging lighting conditions even in the middle of the day. I moved as much as I could to try to get the best lighting as described in the last lesson and used the rule-of-thirds for the final composition. Manual mode, ISO 200, f/5.6, SS 1/125. Nikkor 100-400mm lens f/4.5-5.6.

-
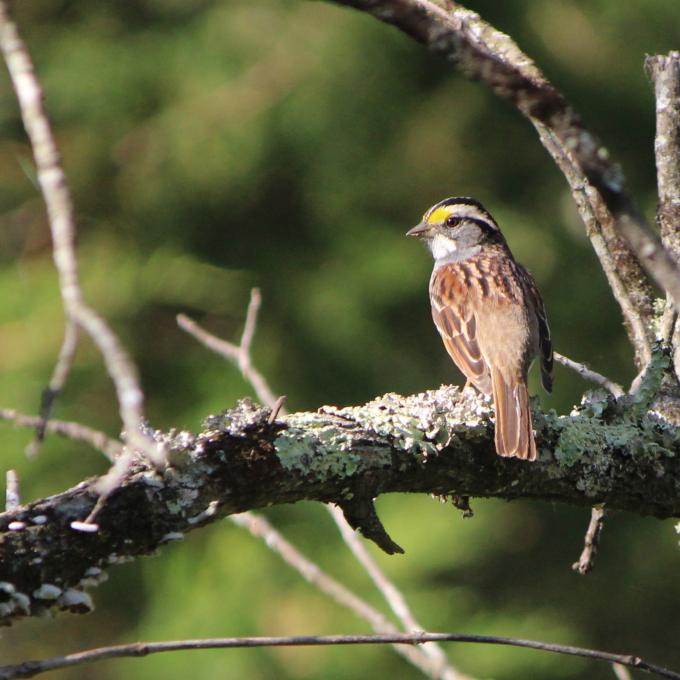
I went out two days in a row to practice, and am very happy with some of the pictures I took and with the lessons I'm learning. I often miss shots because I'm too slow and not confident in my settings, but I had some moments over these past two days where I felt more confident in my decisions for settings, and more able to quickly get the shot because of that confidence. This photo of a white-throated sparrow is one of the best bird portraits I've taken, and it was possible because I had good settings already in place (autofocus locked in good spot, ISO higher because of intermittent shady patches, aperture priority mode), and moved quickly and with confidence to capture the bird for the brief moment it was there. I like how the arcing branches frame the bird and mirror the eye stripes. I played with cropping options, but ultimately like the use of rule of thirds for this portrait. -
Where's discussion of "Understand and Play with Light"? Would like to have discussion of back lighting as it pertains to birds in flight. One of my difficulty with back lighting is with birds in flight. With strong back lighting I find it difficult in manual exposure mode to expose for the bird without blowing out the background. Typically unless I'm spot metering and even when being quick enough to switch to spot metering I usually end up with silhouette of the bird.
-
Typically, you can't really expose for a backlit bird without blowing the background/back light
1 way of dealing with this is exposing for the highlights and underexposing the bird and masking in post and trying to fix the exposure on the bird. Doesn't really work too well imho and I don't recommend it.
In reality, it's always best to shoot a front lit bird. -
@David As I said, typically I would have used spot metering to expose for the bird only. However, the bird showed up unexpectedly and didn't have time change metering modes or even adjust exposure.
-
@GEGJr Yeah that does happen. I'm lucky in that the UI button design on my R3 lets me change shutter speed/aperture and ISO all the flick of a finger and it's very quick and intuitive. Can easily change at a heart beat and with my eye up to the viewfinder. It does make it a bit easier in situations like that, and that's something that a tool should do. Make your life easier.
-
@David My A7RM5 and A7RC have a dial that allows me to increase and decrease exposure on the fly butin the case of an unexpected and fast flying bird suddently coming into view, there's no way to change it that fast. However, sometimes if I happen to notice it coming into the frame I can start turning the dial to adjust the end exposure. But the other issue, at least for me, is that if I'm tracking a specific subject I'm only able to adjust the overall exposure. Can't have my cake and eat it, too. Plus, I'm still relatively new to the mirrorless cameras I have now. On my old DSLR (DSLT Sony A99M2 and A77M2) I had over a decade experience so I was much faster making adjustments. But in all honesty I wasn't fastest enough even with those cameras.
-
@GEGJr Practice makes perfect George. The R3 is my favourite camera ever. Lighter than earlier 1 series cameras, a tiny bit smaller and more comfortable in the hand. VERY good button UI, superb AF performance. Despite initial reservations, I have fallen in love with the EVF and no longer care for OVFs. CFExpress cards have opened up much faster shooting speeds and larger buffers, incredibly handy for bursts of action. It's IQ is also the best of any Canon CMOS camera imho. When saying IQ, I'm not just talking about megapixels. I'm more interested in high ISO performance, DR and colour science, of which, it excels in every category.
A good mate has a Sony A73 and it's what I consider to be quite horrible in the hand. -
@David No offense but frankly, I don't care much about systems. I happen to use Sony because when I got into 35mm SLR the Minolta HTSi+ felt really good in my hand. I held the them all (begginer) the brands in my hands. Up to that time I had been using P&S and fixed lens and TLRs. These days almost all digital cameras do all things pretty well. Of course some cameras do somethings a little better but unless you're a beginner and its a first DSLR or Mirrorless about the only thing that separates them is how they feel in hands and the locations of all the dials and buttons. When cameras started using EVFs I didn't really clear for because I was completely used to OVF. When I got the Sony A99 (SLT) and A77 (also SLT) and upgraded to version II on both I was got sold on the EVF because they both had virtually 100% view. I don't even pay much attention to the ISO range because I control the ISO limit and don't typically require to be able to make pictures in near darkness and if I do than I must be prepared to accept what I get. Coming from the film and slide time you couldn't even think about getting a film over 1600 ASA. I believe you can now get 3200.
-
@GEGJr Sorry, but have to disagree. Camera "feel" is important. A camera that's too large for small hands? Gonna be uncomfortable. A camera with poor button UI? That's going to instigate a lot of frustration from the user. Think of it like this:
You own a car, yes? Most cars do things pretty much the same these days. What really matters is the road. A good road? Great. A bad road? Not so much. Same car. That analogy applies to cameras. The camera is a tool, a means to an end. That end is achieving reliable, high quality images, and make you, the photographer's life as easy as possible.
Being able to see the viewfinder in real time is a game breaker for me. Overlayed Histogram? Even better.
High ISO isn't just for near darkness. If I'm shooting a fast bird, say, a Peregrine Falcon, I'm shooting at LEAST 1/4000. Even in bright daylight, I need to bump my ISO to get a balanced exposure. Especially since I like to shoot at f8 (1 stop less than the maximum f5.6 I can achieve with my 500mm prime and 1.4x TC). I'm quite often shooting at 1/4000, f8, ISO 4000-5000. Speed is of the essence in this example. I'm spoiled by the R3 having class leading high ISO performance, only better by the R1. Sony's A1/A1II come close and are 50mp, which is very nice. But Sony's high ISO performance in their lower range cameras is far inferior to the A1/A1II.
Back in the day you could get T-MAX up to ISO6400 if my memory serves me. Grainy as hell though, very horrible IQ. ISO104000 on my R3 looks better than ISO6400 t-MAX. No comparison. Modern NR AI software doesn't do a great job of cleaning up film grain either I might add (and you have to add the scanning process to the equation, taking more time). -
@David You said, "Sorry, but have to disagree. Camera “feel” is important" I beg your pardon, but didn't say that? I think I said "when I got into 35mm SLR the Minolta HTSi+ felt really good in my hand."
You said, "High ISO isn't just for near darkness." Did I say it was just for darkness? I don't think I did. But since you are putting words in my mouth, you are correct. Even in broad daylight, to a camera shooting at f/8 at 4000th of a second it might as well be dark. High ISO these days is being to allow high shutter speeds thus balancing the exposure especially, also as you have pointed out, because many lenses are can't capable of extremely low f-stop numbers such as f/2.8 and lower (aka large apertures). So as you have already said, shooting at f/8 at very high shutter speeds requires very large apertures and, or high ISO. Back in the day there was no such thing as ISO 104,000 film.
I think we are saying the same thing just saying it differently.
-
-
I'm new to the hobby, so this was my first time stepping into the manual settings of my camera. This Pileated Woodpecker surprised me when he came flying into my backyard, and the sky was too blown out in the auto settings to see him well. I tried to consider the rule of thirds while taking this guy's photo, but wanted to avoid a distracting branch that is just out of my crop to the left. This isn't my favorite photo that I've taken, but it was fun to get my camera out of auto mode and play around with it. For this photo I was adjusting the aperture manually. f/6.7 (this is the max for my lens), ISO800, 1/400s
-
Practice makes perfect. I would suggest looking at YouTube for videos on "exposure triangle". You'll feel more comfortable and confident as time goes on. I have default settings on my R3 (1/1000, f8, ISO1250). I adjust by eye in the field, making a guestimate of what ISO I'll need to get the right exposure. Most times I'm pretty spot on these days, but that's a lot of practice. Your eyes do get used to assessing an image mentally.
Sometimes, it's not possible to get an image of a bird with a clean background, especially smaller songbirds. It is what it is. Enjoy the birds. -
@David Do you have any videos to suggest? I watched a couple, but didn't find them easy to understand as a beginner. I appreciated Melissa's break down here and was able to utilize the skill a little this time at least. I'm definitely not at a place of being able to guestimate myself. Outside of photographing the moon, this was my first set of passable photos in manual mode for me.
Do you find your images get grainy at a higher ISO? I did one photo of this pileated with a higher ISO and it was super grainy. -
@Kiersten Hi Kiersten,
I'll try and explain. There are 3 settings, that when combined, affect the amount of light that enters the camera. These are shutter speed (TV mode on some cameras, which stands for Time Value), aperture (AV mode on some cameras, which stands for Aperture Value) and ISO. ISO is the sensitivity [to light] of film or a digital sensor.
When combined in the correct amounts, they create an image that is correctly exposed.
Each value is changeable in "stops" (some cameras let you change the values in 1/2 or 1/3 stops, which is more precise). When you change 1 value, then you need to change 1 of the other 2 values to compensate to create balance. If you value movement, then a higher shutter speed is a requirement. This in itself, lets less light in. So, you either have to open up the aperture (to let more light in) or increase the ISO (make the digital sensor more sensitive to light) to get the same balanced amount of light entering the camera. Same if you value aperture.
Let's do some maths. Same your camera settings are 1/500; f8 and ISO 800.
You want to shoot a faster shutter speed, say, 1/1000. To get the same balance, you need to either open up the aperture (wider hole letting more light in) or increase the ISO. Now, going from 1/500 to 1/1000 is 1 stop by the way. In this example, you could:
1/1000; f5.6 (opening up the aperture by 1 stop) ISO 800.
or
1/1000, f8 and ISO 1600 (increasing the sensor's sensitivity by 1 stop).
All of these settings let in the same amount of light. 1 focuses (no pun intended) on shutter speed to better freeze movement. The other adjusts the depth of field (field of sharpness) by adjusting the aperture. And ISO increases the sensitivity of the sensor to light (in this case with a digital sensor, it amplifies the light signal). The amplification process causes more digital noise as a result of noisy electronic circuitry.
Generally speaking, it's better to adjust the shutter speed or aperture value rather than ISO. Higher ISO creates more noise, which hides fine detail. Yes, Noise Reduction programs are very good today, and can rescue images shot at higher ISOs, but it is typically better to try and adjust shutter/aperture values before touching ISO. Keep that ISO value as low as possible given the shooting circumstances.
Shutter speeds in steps:
1 second; 1/2 second; 1/4; 1/8; 1/15; 1/30; 1/60; 1/125; 1/250; 1/500; 1/1000; 1/2000; 1/4000; 1/8000 (a typical range - some cameras do have faster shutter speeds, but they are typically the higher ended cameras). You may want to focus on shutter speed to say, freeze the wing movement of hummingbirds. At 1/500, their wings will be blurry. A 1/8000 or 1/16000 (if your camera supports that shutter speed) their wings will be more "frozen" in place, with less blur.
Aperture values in steps:
f1; f1.4; f2; f2.4; f2.8; f4; f5.6; f8; f11; f16; f22; f32
not every lens will go down to f1, or up to f32. The lens will have its aperture value range printed on the lens, usually on the front of the lens. Each step means double the amount of light entering the camera than the prior step. For example, f8 lets in half the light that f5.6 does. f5.6 lets in twice as much light as f8.
ISO is just the sensitivity of the sensor or film. How effective it is in responding to photons hitting it. At the cost of either film grain (film) or electronic noise (digital sensors).
I guess 1 way to think of this is to think of a triangle. All angles in a triangle must equal 180 degrees. If each angle is 60 degrees, it's an equilateral triangle. If you adjust 1 angle, you need to change either of the other 2 (or both) to get them to sum to 180 again. The same logic applies to shutter speed, aperture value & ISO. That's why it's been called the "exposure triangle".
It's a semi-difficult concept that takes time to master. All I can suggest is to think what is important in the shot? Freezing the action? Then adjust shutter speed to a higher value. Adjust aperture and/or ISO to get the balanced exposure. If depth of field is valued (say, you want the background out of focus and a nice smooth background) then aperture is of importance. Open up the aperture to a larger opening. Say, from f8 to f5.6. If you're shooting in a dark location or at dusk/dawn, then ISO, combined with shutter speed and aperture value is probably a good idea.
mix 'n' match!
Duade breaks down the concept of manual mode in this video:
https://www.youtube.com/watch?v=kh1MBfSaCUI
I think it's a good video, but it may not work for you. Everyone understands concepts differently. I've been using metered manual mode for many years (since 1987). That's nearly 40 years of experience. Yes, I found the exposure triangle concept difficult at first, but I went out and practiced a lot and eventually got my head around it.
I really hope this helps. If you have questions, ask, I'm happy to try and help. -
@Kiersten I forgot to mention grain at higher ISO. Yes, that is normal. It does vary from camera to camera. My camera, is well regarded as the king of high ISO (as is the top of the range R1). Sony's A1/A1II are pretty good, as is Nikon's Z8 and Z9.
A few things - noise is a function of the size of the pixel(s). Smaller pixels means more noise. Think of it like this - a small bucket and a larger bucket. Which holds more water? The same applies to small vs larger pixels. The latter hold more light. More light means less amplification required by the electronics that support the digital sensor.
Smaller digital compact cameras have very small sensors. This means smaller pixels. They will never perform as good as a camera with a larger sensor in terms of noise. Have a look at the camera sensor size comparison chart here:
https://capturetheatlas.com/camera-sensor-size/
imagine each sensor has only 8mp. The largest sensor size "medium format' has physically larger dimensions. Pixels will be larger. This applies down through each sensor size. Micro 4/3s will always be a lot noisier than say, APS-C or full frame or medium frame. The sensor size is smaller, so the pixels are smaller.
Now, not all sensors have the same megapixels. Sony's excellent A1 is full frame (36x24mm sensor size0 but is 45mp. My R3 is also full frame, but it ONLY has 24mp. So the pixels are larger, thus letting more light in, and requiring less digital amplification from the sensor's support circuitry.
At lower ISOs, this isn't too much of an issue. At higher ISOs, it does become an issue, because more amplification of the light signal is required, thus more noise. My R3 requires less amplification at ISO 12800 than the A1's does (larger pixels, more light!).
Pixel size also impacts on DR (Dynamic Range) - the number of stops between the darkest and brightest points that the sensor can record without turning pure Black or White ("blown out"). Blown out means no information or detail in that pixel. A smaller sensor design will have a smaller DR (say, 8 or 9 stops between darkest and brightest). My R3 can go up to 14 stops. That gives me more exposure latitude leeway so I can preserve detail in the darkest and lightest areas of the image.
Both noise and DR are a function of pixel size and dictated by physics. We cannot change physics.
As you are using a camera with a smaller sensor size, you will struggle with higher ISOs. The good news is, there's modern software out there that can help clean up and remove the digital noise. Software such as DXO Pure RAW, Topaz Denoise AI and Adobe's denoise function in Lightroom are invaluable. The first 2 aren't free, the last 1 is if you have an Adobe photography subscription and can use Lightroom/Lightroom Classic.
Like with film, sometimes grain/noise is wanted as it adds "character" to the image. As the artist, that's your decision!
1 final thought - digital sensors require light. If you starve them by underexposing the image, you will make the digital noise look even worse. Try and get the exposure balanced and correct when shooting at higher ISOs. Your imagers will thank you. Also, darker backgrounds tend to show up noise more than a lighter background. Try and pick lighter backgrounds behind your bird to limit how much noise is apparent.
Sorry for such long replies.
Cheers,
Dave
-
-
A shot of a Sacred Kingfisher from a few years ago with my Canon 7DII. This is a crop, but it was cropped to place the bird at an intersection point of the "rule of thirds". The branch that it is perched on leads nicely into and out of the frame. There was dappled light through the leaves of the gum tree on the Left hand side of the frame and I tamed that somewhat in post processing so as to not be so distracting from the bird. I do tend to use the rule of thirds quite a fair bit.
-
I blurred the background using a wide aperture. I cropped the photo so the Hairy Woodpecker's head is at the intersection of the upper third and left third in the photo. It does create a more pleasing photo than just having the bird in the center. -
Cropped this image using "rule of thirds", rather than centering the bird's head and liked the result.
-
The lighting lesson makes complete sense. I tend to like backlit bird photos and now recognize why the side lit birds have more definition. These are lessons I will implement in the future.
-
I experimented with Depth of Field as depicted in the following composite:
The left column photos were shot at f5.6, the right column at f25.
The top row is a sprinkler that is frequently used as a perch by flycatchers and white-eyes. The shallow depth of field works well in this case, because the background is about 5 metres away from the sprinkler.
In the bottom row with the Helmeted Guineafowl, the effect is not as pronounced, the background is much closer than in the top row photos. But still the softer background improves the left hand photo.
I also sat down, with the camera on a tripod with only one section of legs deployed. The photo's are about on eye level; also improving the shots. I will definitely use this way of shooting in future. -
I have used the rule of thirds to compose this image, and it came out well -
I had the rule of thirds roughly in mind when placing this Downy’s eye in the frame. -
What I saw outside my window last winter. No time to adjust, full auto with my Canon Rebel and open Fstop
-
-
I felt this image (Black Winged Kite) was better centered as it was having lunch.
-
During a recent trip to Peru, our guide spotted this great potoo mother and chick "hiding" and sleeping on a bare branch, perfectly camouflaged. In the photo, I positioned them in the lower third of the frame to leave some negative space at the top. I really love how the branches with dead leaves circle around the two, almost forming a heart shape.
For this greater coucal image that I took earlier in Southern China, the leaves were quite messy, and the bird's eyes were not sharply focused. It's by no means a decent of bird photography, but I really enjoyed the coucal's interesting wing-spreading gesture. So, I decided to place it right in the center and crop the image square to emphasize its posture and remove as many distractions as possible. -
I went to a local dam where I knew there were birds. The only public access to view the dam places the sun to the side of the photographer and required a long lens. Luckily most of the birds present were large which helped with obtaining images with the birds a reasonable size in the photos.
The first photo of a Cape Barren Goose obeys the thirds rule.
The pair of Cape Barren Geese obeys the thirds rule also.
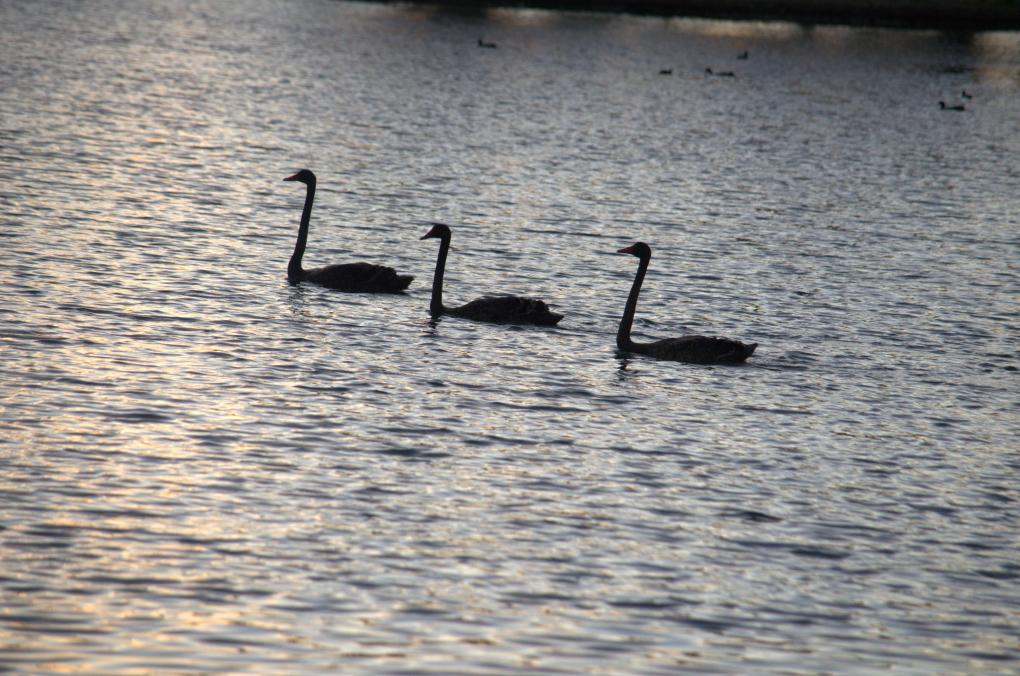
The third photo of two Masked Lapwings flying towards a group of three Black Swans (two with tails up feeding) does not obey the thirds rule. While it is in interesting photo I don't find it as pleasing as the first two photos. -
I did this activity yesterday at a park nearby. The first image was shot (and cropped) using rule of thirds. The second image was not. The lighting was fairly soft in both photos (heavy shade in the first) and early morning direct light. I like the Red-Bellied Woodpecker’s position in the photo as it reflects the activity of the woodpecker as it foraged for food.
I think the stability and centeredness works for the Black-bellied Whistling Duck duckling photo. I think it works to draw the viewer into a closer connection with the subject.
-
Cedar waxwing, Nikon Z6, Nikkor 600 mm f/6.3, photo shot with f/6.3, 1/320, ISO 400. The placement of this bird follows the rule of thirds, with the eye exactly on the upper left crosspoint. The photo is pleasing, in part because the bird is turned and looking back from its position and there is good contrast in colour between the bird and the background.
This version does not adhere to the rule of thirds; there is much more of the background in the photo. In some ways, I prefer this version because the subject of the photo stands out even more, this highly-coloured bird with a very stylized pattern of coloration providing a strong contrast with the more constant green of the rest of the photo. -
I took this picture of a House Finch from my deck at ISO 1600 600 mm 0 ev £6.3 1/640 s after practicing with my new Sigma 150.0-600.0mm lens.
-
I used my zoom lens to capture this picture of a Nuthatch in a local wetland park. I was sitting on a bench looking for birds and happened to notice this bird on the bench beside me. My Zoom was not going to get this shot. Any way the bird flew away to a bridge post and stayed around long enough for me to get a few shots. This one taken at f 5.6 1/250 ISO 800. It was a day full of clouds with sunny breaks, and wooded I found it a challenge getting the right settings in manual mode. I did a bit of photo editing, cropping.
-
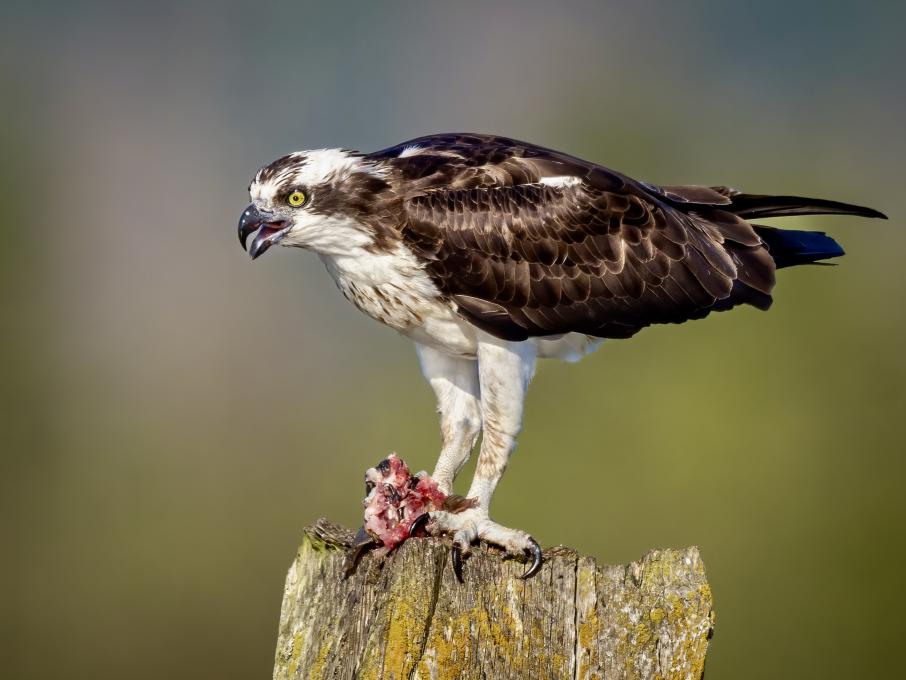
I think this is more along the lines of the classic image with the front lighting and the creamy background. I think the Osprey could use a little more space around it, so maybe I will try to re-edit... but I placed the eye essentially via rule of thirds.
-
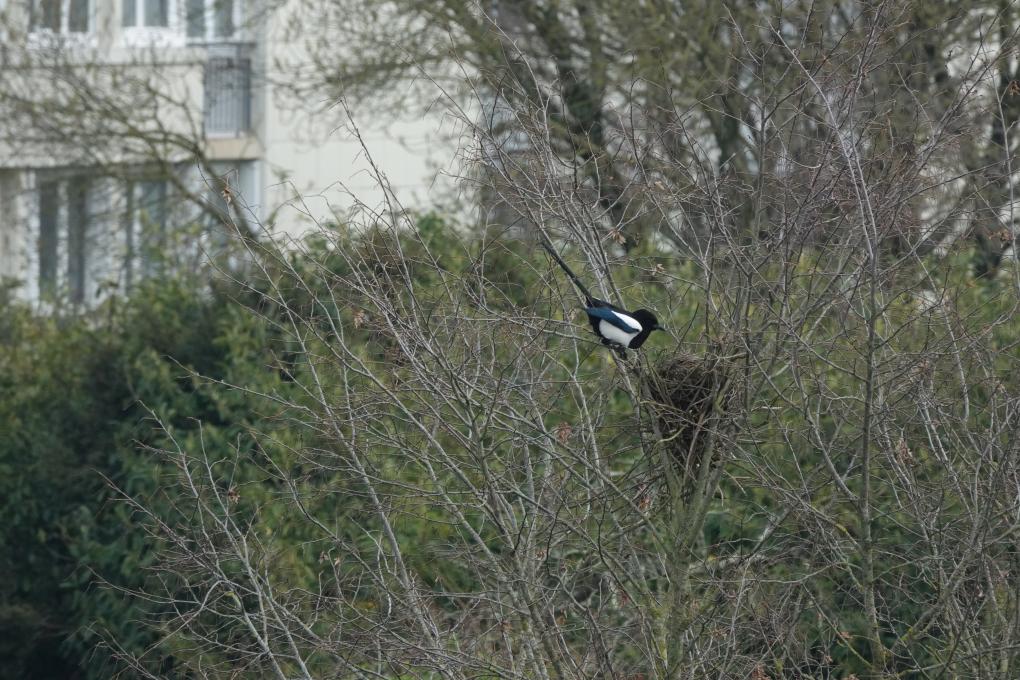
In this photo of the Eurasian Magpie, I tried to use the rule of thirds, but at the same time show the alignment of the bird's tail with the branches. I realized afterwards that it would be better to use the camera's grid pattern to take the photo to following the rule of thirds.
-
Hey everyone, when I tried taking photos keeping both the elements of compositions with the rules in mind, I think it resulted in better photos altogether especially if your bird is stationary, but when you are trying to take photos in the manual mode with lots of settings going on parallelly in your mind like the exposure trifecta, the focus mode, the position of the bird in the frame, etc. All of this makes you forget the rules cause the bird will suddenly appear and you are struggling with making your camera work in the right way and by the time you're ready with the camera, the bird flies away into a different light and then you have to change your settings again. Reply if you have the experienced the same problem. After having many tries at it, I did manage to get a few shots.
The first picture is taken while following the rules and the second one is taken while breaking the rules. I think that photos with rules resulted in a decent perfect picture but in order to get creative and try out new angles to make it a unique photo we need to break the rules. Do share your opinion as well.
-
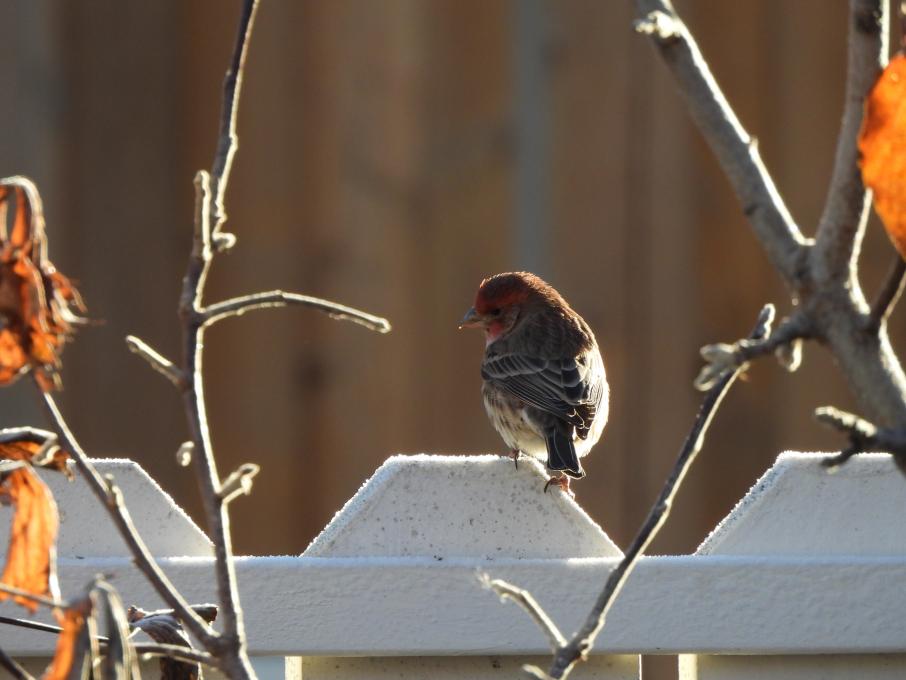
Took advantage of side lighting when shooting this House Finch in my yard one frosty morning.
If I had taken the picture when he was turning the other way, I think there would have been a beautiful glint in his eye.


 I took this picture of a House Finch from my deck at ISO 1600 600 mm 0 ev £6.3 1/640 s after practicing with my new Sigma 150.0-600.0mm lens.
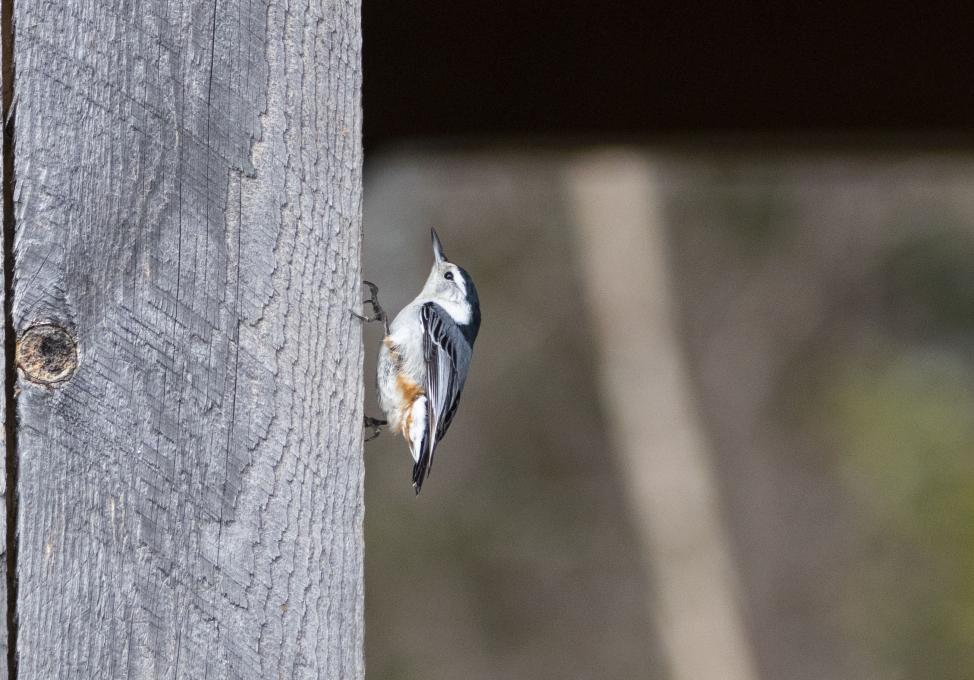
 I think this is more along the lines of the classic image with the front lighting and the creamy background. I think the Osprey could use a little more space around it, so maybe I will try to re-edit... but I placed the eye essentially via rule of thirds.